Reflection
For the late publishment, I have been explained to Russel by email about the reason of that with the reflection assignment as attachment before the deadline.
Reflection
Introduction
In the reflection, the final assignment of the 1:1 fuel tank would be chosen due to its need of incorporation of all the skills what have gained throughout this semester and its difficulty (most consuming time). In my group, we were willing to take the risk to pick the third fuel tank which is a bit hard than the first one as our group assignment after discussion.
The reflective steps:
Step 1: creating the 3D image of the model for the fuel tank
We took few days to figure out the model of our fuel tank through using various unfamiliar software under the help of tutors.


Step 2: laser cutting and assemble
After finishing the laser cutting, We assembled the components of the skeleton of the fuel tank carefully and it needed us to work together because some tolerance problem may make it hard.

Step 3: finalise the model and paper template
We applied the suggestion from tutors to decide to divide our fuel tank as 3 sections, which is the one on top, and two similar size on left and right respectively. It was better to have as less joining as possible because the more joining part would make the adjusting work become inflexible and difficult. My part was doing the segment on right. We used the medium hard paper to form the shape of the model to let it have smoother surface.
Step 4: shaping
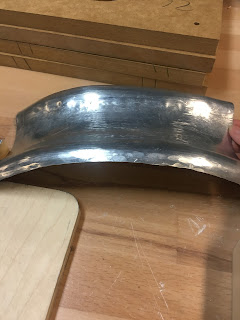
Once I got my metal sheet in a rough size with allowing an enough gap to the boundary, I tried run my aluminium sheet through the roller so many times by labelling different kind of curve in the sheet, rolled those parts respectively, fitted the model and adjusted the curve again, attempting to create an ideal shape to perfectly fit the model. And it was definitely cheer me up when I did it.
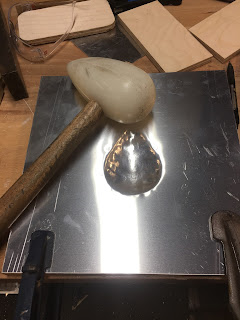
Then I marked a line that need a back-cure to fitting the top side of the model, and I punished it on the sandbag and the steel doll, an unpredictable shape was born!! The efforts contributed my perfectly fitting shape to the another far place…. I tried to keep adjusting the curve to backing on the track, however, when I punishing a specific part of the metal sheet, then curve of the other parts would be literally changed.
At the beginning of this part, I thought if the shape of mental closer to the model by using roller, then easier for the later work, so as to increase the efficiency for the project. But the cruelty fact vote my thought. So I gave up the shape, I changed my strategy to shape it from the one side to the end.
When I reached the edge part, I cut a fractional of sheet (like the picture shown), another challenging issues occurred at the same time with I was adjusting that gap. The crack became deeper as fixing, I asked Gabriel for help and he suggested me to redo it due to the obvious big crack there...the aforementioned steps were the same while I was quite careful to cut a smaller gap then previous one, it went better than before, but it came with the same outcome when I pinching the ending part of sheet. I had no idea about what should I do next! Because every time I pinched the edges, the curve of the part with gap would change, the gap seemed so delicate.
At that time, I saw that the other group was doing shaping on their part from a rough curve, they could make the shape better in the shaping step. Therefore, I restart it again in a rough curve, and use the same method with them and luckily it worked!!
Later, I shaped it by using English wheel and keep pinched to fit the model smoothly.
So what I have learnt in this crucial step is predicting the outcome of the action, especially for the aluminium sheet, it is impossible that making a perfect curve first and expecting it will remain the nice curve in the later shaping, therefore, the understanding for the material we are going to use is necessary for our later project.


On the tutorial of week 12, Russell gave me a suggestion for my edges by using the shrinker stretcher, its positively work for curved shape surprised me and it helped the work a lot at the end of processing.


Comments
Post a Comment